Welcome to Moda Fabrics!
Butterfly
Butterfly

Please visit Nicola's blog for more detailed instructions with lots of lovely photos.
4", 6" or 12" block
![]()
4” BLOCK
FROM BACKGROUND FABRIC, CUT:
* [A] (1) 3½” square
* [B] (2) 2½” squares
* [C] (2) 1½” squares
FROM FABRIC 1 (CORAL), CUT:
* [A] (1) 1½” square
FROM FABRIC 2 (TEAL), CUT:
* [A] (1) 3½” square
6” BLOCK
FROM BACKGROUND FABRIC, CUT:
* [A] (1) 4½” square
* [B] (2) 3½” squares
* [C] (2) 2” squares
FROM FABRIC 1, CUT: (CORAL)
* [A] (1) 4½” square
FROM FABRIC 2, CUT: (TEAL)
* [A] (1) 4½” square
12” BLOCK
FROM BACKGROUND FABRIC, CUT:
* [A] (1) 7½” square
* [B] (2) 6½” squares
* [C] (2) 3½” squares
FROM FABRIC 1, CUT: (CORAL)
* [A] (1) 7½” square
FROM FABRIC 2, CUT: (TEAL)
* [A] (1) 7½” square
You will also need a bit of ribbon to create the body of the butterfly.
![]()
STEP 1. MAKE HSTs
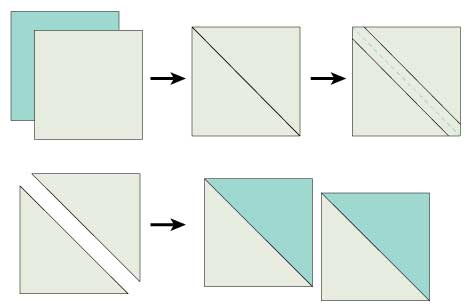
Mark a diagonal line on the back of a 7½” background square and pin - right sides together - to the 7½” teal print square, then stitch ¼” away from each side of the marked line. Cut along that line and press both half square triangles (HSTs) open.
NOTE: You will only need one of these units, so set the remaining HST aside for another project.

STEP 2. MAKE HSTs 2
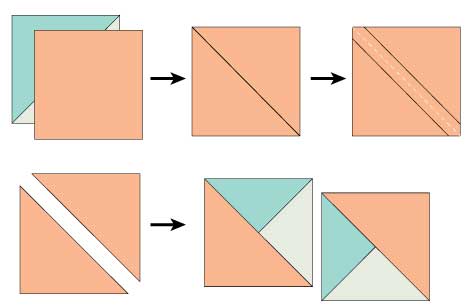
Mark a diagonal line on the back of one of the HSTs at right-angles to the seam and pin - right sides together - to the coral 7½” square, as shown overleaf. Don’t worry that the HSTs are slightly smaller, you will be trimming them down. Again, stitch ¼” away from each side of the marked line, cut apart and press open.
Please note that you will have two sets of mirror image wing units, A & B. Trim to 6½” square.

STEP 3. SNOWBALL CORNERS
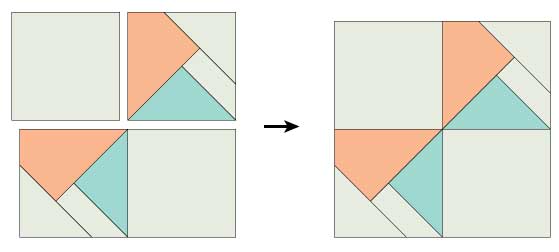
Snowball the wing tips on both A & B wing units with 3½” background squares. First mark a diagonal line along the diagonal of the wrong side of C background square. Sew on the marked line. Repeat with remaining wing unit.

STEP 4. ASSEMBLE BLOCK
Assemble the butterfly by joining each wing to a 6½” background square, taking care with the placement. Then join the two rows together, pressing the seam
open.

Turn a small seam on the ends of the ribbon - glue basting to secure – then applique to the block.
Nicola Dodd
blog: Cake Stand Quilts
Find all Summer in the Garden posts by clicking {HERE}.

Comments